Welcome to our general guide on location building and editing In Chathouse.
The purpose of this guide is to help improve your location performance, build quicker and create better looking rooms.
This guide represents a collection of tips and tricks from the developers and most experienced “builders” in thriXXX.
We assume you have already read the previous articles about overlay, functions, objects, textures and music streams to get the most out of this one.
First step: Come up with a plan
Starting from scratch and letting your art go where your heart desires is very romantic but will most of the time force you to rebuild the location over and over.
Planning plays an important role. Not only does it save time but it allows you to create locations with more immersive experience to your guests and provides unique gameplay and storytelling opportunities.
– When planning your room, please consider:
1. The purpose and the number of players.
2. Performance.
3. Limitations due to the tools available in room editor.
– Suggestions:
1. Different locations require different solutions:
– Featured rooms (always public, 64 players max): build a common area for players to meet and dance, optimization plays a major role here so you will have to compromise on details, lights, animations. Here you can find some tips on creating and submitting a featured location.
– Sessions rooms (both private and public, up to 24 players) can be smaller, with more details and more creativity, still need to be optimized
– Rooms meant to be used mainly in private sessions with your lovers (max 3-4 players) can be much smaller, more creative, perfect to show some details and animations and full of interactive objects.
2. Get all the references you may need before you start building (images, texts, video…). A thorough research can really boost the final result.
3. Focus on immersion and authenticity. Make the location believable, even if it is meant to be unreal or science fiction/fantasy themed.
4. Design with a purpose. Every object must have a purpose and contribute to the final look, use and feel of the location.
5. Make the room fun and easy to navigate, especially for those players who are less familiar with the game.
6. Make all the interactions with the room intuitive or use clear indications where needed.
7. Make your locations unique and surprising, build to create emotions.
8. Build efficiently. Hardware and game engine limitations are also an opportunity for elegant, clever and unexpected solutions. Still, the best room is useless if the average player cannot enjoy it due to performance issues.
9. Consider other players’ work. You may get inspiration and learn brilliant solutions to common issues.
10. Choose the soundtrack for your room wisely. Here you can find some info on music in Chathouse.
Basic building: General Concepts
Basic building in Chathouse mostly comes down to shaping objects and adding material properties.
This article will suggest you begin with editing your textures and material properties. Then move on by duplicating these objects to actually build the room.

Material properties
The first thing you may want to edit is textures. In depth analysis of textures is beyond the scope of this article so we will just briefly describe the most important parameters in this article. You can find all about textures here.
Just remember these 2 important suggestions when uploading textures on the website:
1. Upload textures to MyShares as Material only. Please do not upload as “image”. This avoids bugs in texture display after game updates (black surfaces).
2. Don’t edit/delete textures in your Myshares (thriXXX website) once they are used in a room. You would then need to redo ALL the objects with the old textures in the room.
Transparencies offer a few parameters to edit:
– Material Transparency Mask: when selected, it allows for transparent parts of the texture to be shown as transparent.
– Material Transparency Blending: when selected, it creates the appearance of partial or full transparency in a smoother way (at the expense of performance).
– Material Depth Write: it forces the game engine to render areas behind objects and is necessary when using transparencies.
– Material Layer: it modifies the priority that object has compared to the other objects and is used to correct some abnormalities with transparent objects.
– Material Transparency: This slider allows you to set the transparency from full opacity to full transparency.
In Chathouse we suggest you follow these rules when editing these parameters in different objects:
– Most non transparent objects: Material Transparency Mask = OFF; Material Transparency Blending = OFF; Depth Write = ON; Layer = 16 (default).
– Most objects with transparency: Material Transparency Mask = ON; Material Transparency Blending = OFF; Depth Write = ON; Layer = 16 (default).
– Layers with transparency onto existing objects (posters, texts on a wall…): Material Transparency Mask = OFF; Material Transparency Blending = ON; Depth Write = ON; Layer > 17 (with some exceptions, please test to find the best value).
– See through objects (windows, bottles…): Material Transparency Mask = OFF; Material Transparency Blending = ON; Depth Write = OFF; Layer = 37-47 (with some exceptions, please test to find the best value).
Consider that the transparency modes (MASK, BLENDING) have an impact on performance when “cast shadow” is enabled. Please consider disabling shadows on objects with any kind of transparency.
The general rule for best performance is to limit the use of transparencies and especially those requiring Transparency Blend enabled.
Shadows impact performance when applied on any object, so we suggest you consider disabling them if you are planning to build a large location, add many objects, use animations…
Then set metallic and glossy effects to appropriate values for the material.
Texture Rotation and Translation are pretty straight forward. They do what the name suggests. You may want to edit these parameters mostly to make attached objects with the same textures match.
Texture Scaling affects how the texture is repeated over an object. Texture scaling always look better with seamless textures. In normal mode the number refers to how many times the texture is repeated and only the first 2 parameters are applied.
Texture projector is a very useful feature. It projects a texture image on an object from three 90-degree directions and allows a different use of Texture Scaling.

You can activate it by typing the value “1” or “2” or “3” in the field “Texture Projector (ID / Name)” depending on the mode you prefer:
1. The “projectors” are attached to the “World”, so as you rotate the object the textures on it will warp. When scaling textures you will be able to control all 3 dimensions. Texture size will stay the same as you change the object dimensions.
2. The “projectors” are attached to the object, so as you rotate the object the textures will not change at all. Texture Scaling will work exactly as in mode 1. This is the most popular mode in Chathouse. You can appreciate the real advantage when duplicating an object and changing the shape and size. There will be no need to edit texture scaling anymore.
3. The “projectors” are attached to the object, as in mode 2. When scaling textures you will be able to control 2 dimensions as in normal mode (only 2 values are used). That may force you to edit Texture Scaling after duplicating and resizing an object.
Collisions play an important role. For performance reasons we suggest you turn off collisions for all objects at this point. You will add those later only where needed.
Lastly, edit the level. Level numbers are not related to the visual floor level of the objects. For example you can have level 3 above level 7. just remember to NEVER use level 0.
Shaping and placing objects
You can just start by duplicating an object you have already created (CTRL + D or right click -> DUPLICATE) and moving/rotating it where you want it.
Then edit the size of its sides and adjust the texture scaling if needed.
We suggest you keep the objects at 90 degrees with each other at this point to make building easier.
You may want to start with the base of the structure, then add the walls and move up.
– Manipulators
Manipulators are the visualizers in Room Editors that allow you to control position (arrow), rotation (circle) and size (cube) of objects. In the side bar you will find sliders and numeric values for those parameters too.
You can toggle the manipulators by pressing the W key (translation), E key (rotation) or R key (scaling).
Holding the “ALT” button will snap the manipulator to even steps. Step values can be set in the “Location Editor Settings” in Room Editor Settings Panel for each single manipulator.
Activating “Show Tooltip” will display the numeric value of that specific parameter on top of the game window when hovering with your pointer on the sliders.
– Multi selection and Grouping
You can select multiple objects by left clicking on them while pressing CTRL or SHIFT.
CTRL or SHIFT + Left clicking a selected object deselects it.
On a selection of multiple objects translation will work as usual, you will just see the manipulators on the last object you added.
When rotating a selection of objects, the center of rotation is the object with manipulators. If you keep CTRL pressed while rotating, all the selected objects will rotate on their own axis instead.
Scaling a selection of objects will edit them as a single object.
You can permanently group objects together by selecting them all, right clicking on one of them and selecting “Group Objects” in the menu that pops up. “Ungroup Objects” reverts grouping.
Grouped objects are very useful because you can create complex items made of many objects and edit them as a single object. To select a single object in a grouped batch you just need to left click while pressing the ALT key. Left clicking while pressing ALT and CTRL or SHIFT will multiselect objects in a group.
– Walkable surfaces
Walkable floors are necessary where you want avatars to walk. Examples of walkable objects are Walkable Floor Tile, Walkable Disk, Walkable Quarter Disk and Walkable Landscape. For these to work properly you need to activate collision and set the appropriate level.
When you place walkable surfaces on top of each other the avatar will snap on the highest surface. To have different floors working independently you need to set a different floor level number to them.
Floors on different levels can be connected using a Walkable Floorchange Tile. Just make sure to set the correct numbers for the both levels you are connecting (usually A is the one below). Activate collisions and keep the arrows in the direction of the 2 floors you are connecting.
Walkable floors can be added on top of any structure. You can cover all areas where avatars should be able to walk. Then you can make them transparent by activating “Material Transparency Mask” and setting transparency to 1.
At this point you should activate collisions on walls and any structures that should block avatars from walking. Or better yet for performance reasons, instead build paths of walkable surfaces around walls or furniture. You may want to add collisions only on very few objects and only if strictly necessary for the dynamics of the room.
Advanced reason why: The game engine needs to compare each object with collision with the avatar position on the floor tile it’s on thousands of times per second. The more objects with collisions, the more steps for every cycle (the more work for your system). The perk here is that the game cycle only cares about the one walkable tile the avatar is positioned on, so having many tiles doesn’t make any relevant difference.
– Sky Background and Haze
The Blank Room comes with a very useful option to customize the background.
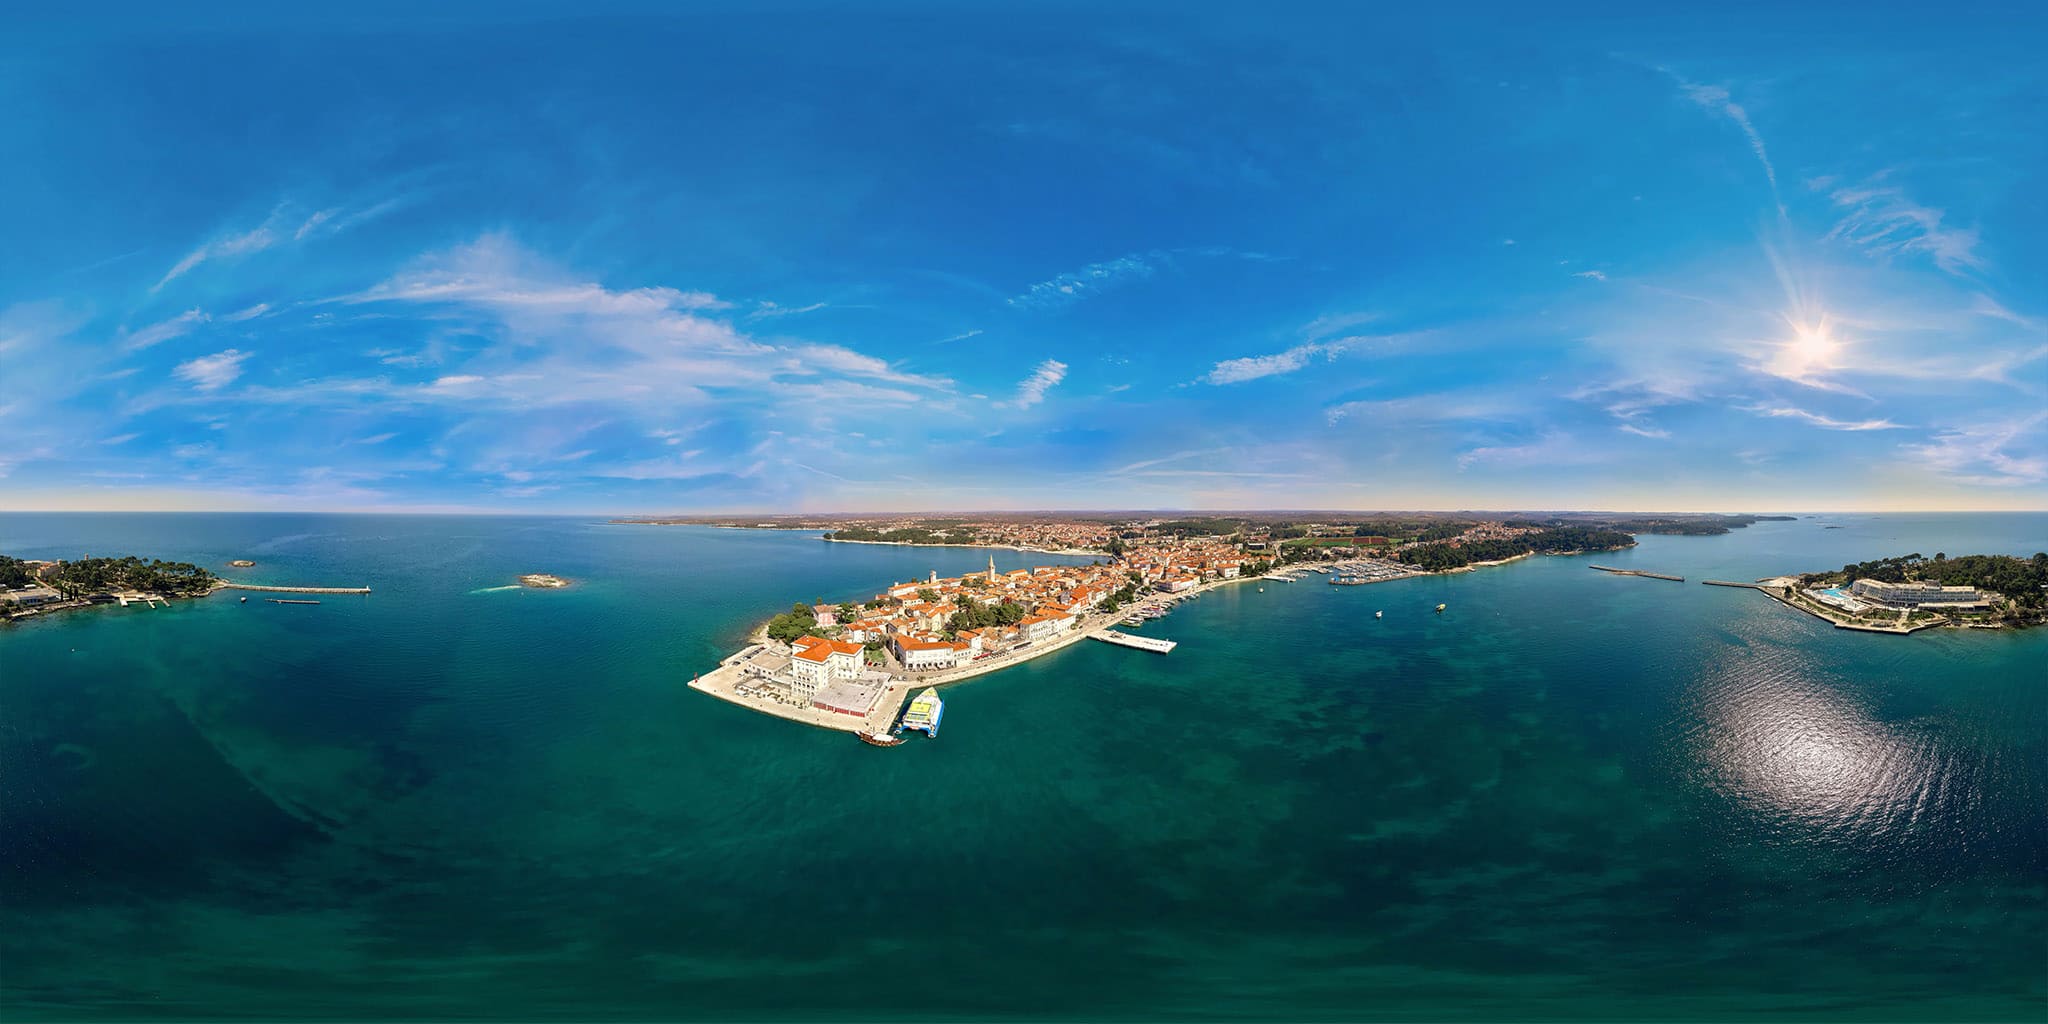
The sky can be edited using 2048X1024 pixel seamless spherical panorama images (360 degrees angle view). You can find some free images on the internet, just make sure they are meant to be used as a texture on a spherical background. Make sure the image size is correct and since the image is quite big, always use a proper compression to make the file size as small as possible.

Since these images are seamless, you can decide to use only the upper side of the 360 degrees image (the part above the horizon, still the final result must be 2048X1024). Then you can set both texture scaling values to “2”. This way you will double the final resolution at the expense of realism since you will probably show 2 suns or moons and the effect below the horizon will be unrealistic.
Here you can find some examples of sky backgrounds. Most work best with texture scaling set to 2 and texture translation moved up by 0.5.
The Haze is useful to smoothen the sky to Earth transition. Adjustments depend entirely on the nature of the Sky Background and the Walkable Landscape, so there is no general rule here.
– Lights
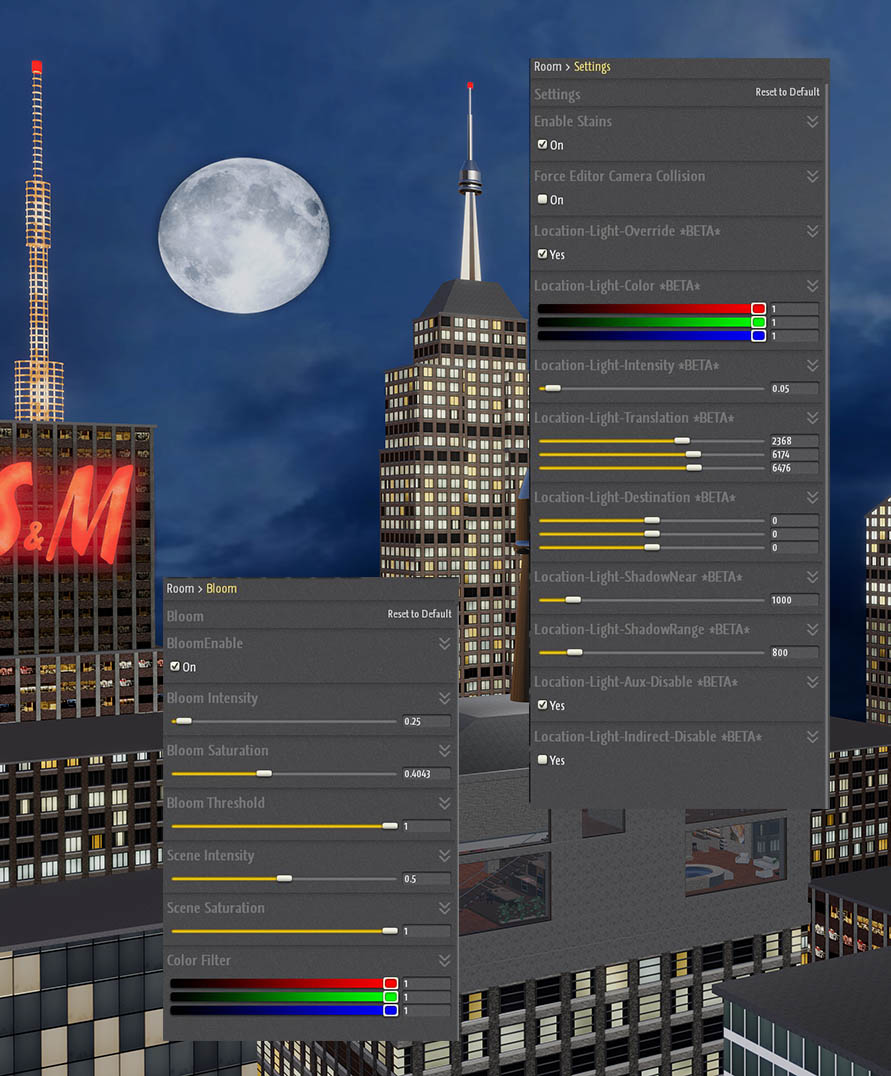
Main lights in Chathouse can be edited from the Settings and Bloom panels.
To make things easier, imagine you are on a movie set. Think of the Settings panel as a way to change the light bulbs, while in the Bloom panel you can select lens and film for your camera.
In the Settings panel you will find the options to set the main light. You will need to check “Location-Light-Override” to edit all the available parameters. We will consider here only the most relevant ones.
1. Location-Light-Color sliders will allow you to change the final color of the light as for example at sunset when red is dominant.
2. Location-Light-Intensity is the most important setting as it can change the look in a room from day to night. Basic setting is 1 (day). We find 0.05 ideal for a night location.
3. Location-Light-Indirect-Disable will remove indirect light. Real light bounces off walls and objects (especially reflective ones like metals and mirrors). The effect is very subtle if noticeable at all, unless it’s a dark room full of reflective objects. Disabling indirect lights will considerably increase performance.
In the Bloom panel you will be allowed to edit both objects illumination and bloom effect.
1. Scene Intensity is the main parameter you will need to edit to attain a correct night effect. 1 is the correct value for a day location, 0.3 to 0.5 will offer a reasonable option for a darker environment. If you haven’t purchased “bloom” from thriXXX store, you will be only presented with the Color filters. Use those to reduce luminosity.
2. All the other parameters will affect the bloom effect in the whole room. There is no right or wrong setting here. You are offered a wide range of effects, from crisp and clear to blurry and cinematic. It is up to you to adapt these settings to the effect that best suits your location.

– Final touches:
Before you can consider your room finished, there are a few steps you should take:
– Make sure all the collisions are set correctly and your avatar can walk exactly where it is supposed to.
– Remove shadows that you don’t need or add those needed (floors, glass…). In complex rooms you may decide to have ALL the shadows removed from your materials to start with and maybe add just a few that you realize are really necessary when the room is finished.
– Make sure you are satisfied with the final light effect
– Add markers (right click > marker) where you want players to spawn. This option allows you to force players to walk a certain path in your location or helps them reach faster the area in the room where most players are. It all depends on you.
Resources
Texture libraries:
https://www.textures.com/
https://3dtextures.me/
https://polyhaven.com/textures
https://www.sharetextures.com/textures/
https://ambientcg.com/list?type=PhotoTexturePBR,AtlasPBR,DecalPBR
Online image compressors:
https://compressor.io/
https://www.iloveimg.com/compress-image
GIMP
https://www.gimp.org/downloads
Normal map plugin for GIMP
https://drive.google.com/file/d/1wcJoJ-fXieB7aPu8rLRRqzOHQr2hwyUq/view?usp=sharing
thriXXX Gamerotica
https://www.thrixxx.com/gamerotica
@VelvetCrimson‘s collection of 512X512 textures
https://www.thrixxx.com/profile/34185462/VelvetCrimson/myshares/1643018
@IuliusCaesar‘s collection of 512X512 PNG textures
https://www.thri.xxx/profile/19166005/IuliusCaesar/myshares/1659346
@IuliusCaesar‘s collection of 1024X1024 PNG textures
https://www.thri.xxx/profile/19166005/IuliusCaesar/myshares/1659342
@IuliusCaesar‘s collection of 1024X1024 JPG textures
https://www.thri.xxx/profile/19166005/IuliusCaesar/myshares/1659342
Contributors
This article was written with the contribution of @VelvetCrimson, _Maggie_ and @IuliusCaesar

