Chathouse Roomeditor offers you many options to create your own unique locations and enjoy them in single mode or with your friends. With virtually endless possibilities, your imagination is your only limit.
The 2 most powerful tools to customize your locations are Universal Objects and Picturewalls.
Note: Both Picturewalls and Universal Objects are not part of the basic game and must be purchased separately in the Chathouse 3D Shop unless you already have an active subscription.
The Universal Objects pack adds basic shaped objects with extended manipulation features and editable textures to your room editor. This pack will allow you to build your own pools, houses, outdoor areas, clubs, dancefloors, ships …
The main features of the Universal Objects are shapes and textures.
Many different shapes are available and more are to come. You can manipulate shape, size and position of these objects.
You can also add your own textures to these items to create really unique and personal locations.
To insert a Universal Object into your room, you need to right click on your location inside the Room Editor and select the object of your choice.
By right clicking on your object and selecting the “edit” function or by opening the settings tab in Room Editor, you access the panel where the following functions are available:
1.1 Universal Objects Options:
1. Selection
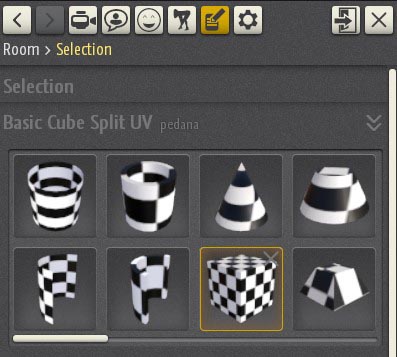
It shows the list of available objects:
- Waterdisc/plane: Water animations which you can add to your pool or any other water surface.
- Haze: This adds a foggy layer masking the ground-to-background transition as seamlessly as possible.
- Groundplane: Basic walkable floordisc with sand texture.
- Sky Background: Allows you to customize your background.
- Different walkbable Grounds: On these objects the avatars are allowed to walk. They can be identified by the red feet logo. In order to function properly, they must have walk collision set to “on”.
If you experience malfunctions on a floor unit (inability of avatars to walk on it) please disable all walk collisions from other objects that touch that floor unit.
Floor Units also give you the option to assign a level number to them. Floors at the same level will allow the avatars to freely move from one to the next. If one floor is above the other, the avatar will automatically snap to the higher floor. Floors at different levels need a connector to move your avatar from one tile to another. You can find more informations on the multi-level feature here (scroll down). Tip: never use level 0 since in some situations it may not perform correctly. - Different geometric Objects: Cubes, spheres, cylinders and other shapes…
2. Name:
You can identify one or more objects with a unique name for your reference.

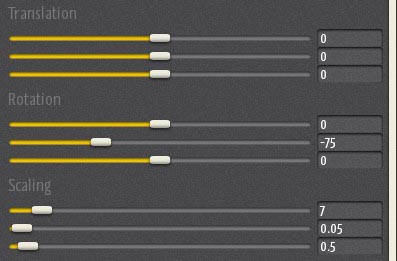
3. Translation, Rotation and Scaling:
The manipulators work in a similar way as with the Basic Objects. You can click here for more details.
– Translation will modify the position of your object on the X,Y and Z axis and is measured in cm. (Maximum translation is 1 meter)
– Rotation will rotate your object and is measured in degrees. You can select 2 different behaviors of rotation (Gimbal and Local): in Gimbal mode moving one axis will affect the other 2, in Local mode the 3 axis can be manipulated individually.
– Scaling will edit the size of the object on each of its 3 dimensions. It is measured in meters.
4. Link Input Fields:
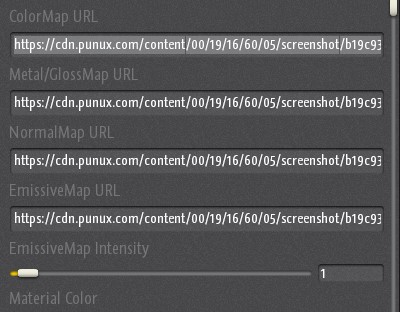
Here is the place where you insert your textures into the Universal Object.
A complete explanation of these parameters can be found in the article dedicated to Textures.
In order to to add your own images/textures to the Room Editor, you need to upload them to the thriXXX servers as described here: MyShares (Uploads and Functions).
The Emissive Maps also features an intensity slider. Here you can find some texture examples from the thriXXX staff and here a repository with over 200 materials at your disposal.
5. Material Color:
A simple RGB (Red/ Green/ Blue) slider that allows you to manipulate the color channels of the textures in each object.

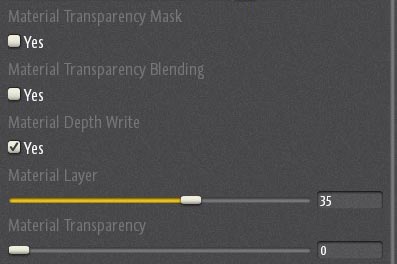
6. Opacity/ Transparency Options:
This tab allows you to play around with transparencies.
Activating the Material Transparency Mask allows texture transparencies in those textures that have transparent areas (e.g. .GIFs, .PNGs…).
Material Transparency Blending allows you to change the opacity of any object, even those with non transparent textures. The amount of transparency is set by the Material Transparency control. Transparency blending is far more versatile than Transparency Mask, but it has much higher impact on performance. We suggest you use it only when necessary.
Material Depht Write forces the game to render areas behind objects. When a solid object is showed on screen all the area behind it is completely covered by the object itself so there is no need for any rendering of that. When you are applying transparency to an object you also need to activate Depth Write in order to correctly render the area behind the object that becomes visible since the object is now transparent. All the objects behind the transparent one may need some “depht adjustments”.
Material Layer is used to correct some abnormalities with transparent objects. It represents the priority your object has when it is rendered in game. You should use it only on transparent objects and leave it to the low original setting for all the rest. As a general rule, give it the lowest value that allows the game to correcly render the transparent objects and what is located behind them. Higher values (usually >34) may prevent the game from rendering details (e.g.: avatar’s hair…)
7. Material casts Shadow:
Sets if the objects casts a shadow or not. Deactivating this function will improve the game performance quite a bit.

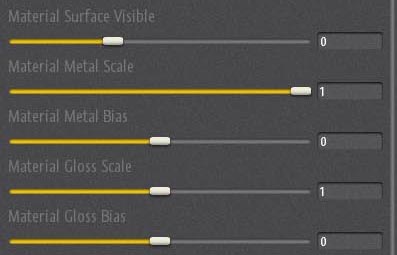
8. Visibility, Metal and Gloss Rendering:
This panel allows you to adjust Metal and Gloss levels for a given object.
More informations can be found in the Texture article.
The Material Surface Visible slider affects how the surface of the object is rendered, with options ranging from transparent to solid (0 = default, 1 = front, -1 = back, 2 = two-sided).
9. Texture Behavior and Global Translation:
Here you can manipulate scale, position and rotation of the texture itself.
Texture translation allows you to control the position where your texture is wrapped around your objects. The two sliders control horizontal and vertical translation.
Texture Rotation allows you to rotate the way your texture is applied on the object.
The Texture Rotation Pivot is the fulcrum (point of rotation) of the texture and can be moved on 3 axes.
Texture Scaling is a very efficient way of rendering higher quality graphics using less resources and improving performance by repeating the same texture in a 3D object. The horizontal and vertical values indicate the number of times the same texture is repeated. The best results are attained by using “seamless” textures that can be placed side by side creating a pattern where you cannot clearly see the points of transition between one texture and the other.
Tip: Setting Texture scaling at 0/0 lets you use the object without any texture (plain white) and you can color it using the RGB color sliders. You can improve your location’s perfomance by implementing 0 scaling.
Translation (Global) Locates the object with coordinates (measured in cm) inside the room, being (0;0;0) the center of the room.
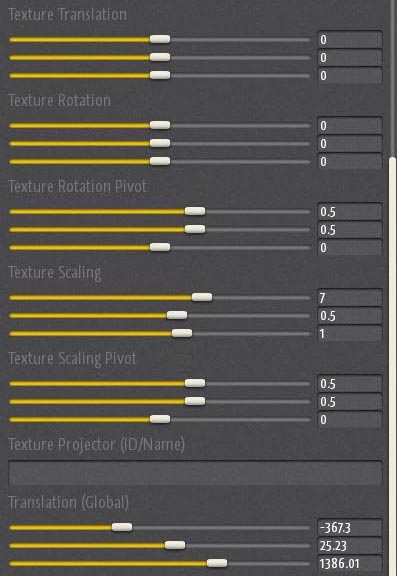
Texture Projector projects a texture image onto a 3D object from 6 sides , XYZ and their negative counterparts at 90-degree directions (Box Mapping). This allows you to apply and scale textures in a different and more effective way on all sides of the object unlike it is in normal mode. You can activate it by typing the value “1”, “2”, or “3” in the field “Texture Projector (ID / Name)“

With Texture Projector you will also notice a difference when using Texture Scaling depending on the mode you choose (the value you type in the projector field):
- 1: the “projectors” are attached to the “World”, so as you rotate the object the textures on it will warp. When scaling textures you will be able to control all 3 dimensions. The values will represent the distance at which textures are placed side to side. For example, 2 will mean that there will be one texture image every 2 meters.
- 2: the “projectors” are attached to the object, so as you rotate the object the textures will not change at all. Texture Scaling will work exactly as in mode 1. This will allow you to change the scale of the object with no need to further edit Texture Scaling values every time. It’s probably the most time saving mode of the 3.
- 3: the “projectors” are attached to the object, as in mode 2. When scaling textures you will be able to control 2 dimensions as in normal mode (only 2 values are used). That may force you to edit Texture Scaling after duplicating and resizing an object.
With Texture Projector you may sometimes need to adjust Texture Rotation to attain the best results.
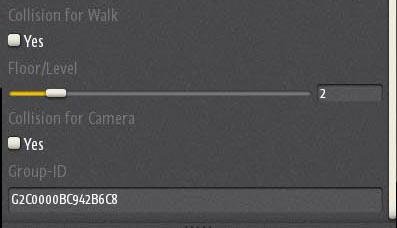
10. Collisions and Grouping:
– “Collision for Walk” turns an object into an obstacle for an avatar’s movements. When Collision is set to “off” your avatar can walk through the object.
This option should be mostly disabled and used only where necessary. The reason is that this feature will reduce your location performance (FPR) and it may also make navigation more complicated and buggy. Collisions MUST be activated on all the surfaces you want your avatar to be able to walk on.
– “Collision for Camera” turns an object into an obstacle for your camera
– “Group-ID” identifies all the objects in a specific group.
2. Picture Walls: Adding pictures and videos to you locations
Picturewalls work like other objects in Chathouse 3D. They can be added, moved, scaled and rotated.
![]()
You can add an image to the picturewall; the ideal size is 1024×576 pixels, allowing a better resolution compared to universal objects.
In order to add an image you need to place the image URL in the given input field. As with Universal Objects, you need to upload your images to the thriXXX servers as described here: MyShares (Uploads and Functions).
You can also add a YouTube video to a picturewall by adding a string of text that includes the URL of the video.
Copying the URL straight from your browser will place the whole page inside the picturewall. You can have the video display better by using the following string of text:
https://www.youtube.com/embed/**videoname**?autoplay=1
This string allows you to play the video covering the full picturewall screen.
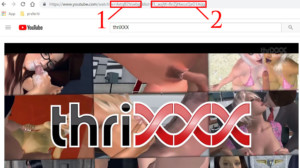
**videoname** refers to the part of the URL that indicates the code of the video (number 1 in the picture below)
autoplay=1 tells the player to keep playing the videos when they are over. You can change the number to 0 if you want all the users to manually start the video every time. (We suggest you leave it to 1)
Here’s some more functions you may want to add:
- playlist=**playlistname** loads a whole playlist (you find the playlist name in the number 2 field in the picture above). **playlistname** is where you add the name of the playlist if you want to include that function
- loop= causes the player to play the initial video again and again. If a playlist is indicated, the player plays the entire playlist and then starts again at the first video. Allowed values are 0 (don’t play in loop, this is the default setting) and 1 (loop).
- cc_load_policy= Setting the parameter’s value to 1 causes closed captions to be shown by default, even if the user has turned captions off. The default behavior is based on user preference. Allowed values are 0 (don’t show captions) and 1 (show captions).
- controls= indicates whether the video player controls are displayed: Allowed values are 0 (not displayed) and 1 (displayed, this is the default setting).
- showinfo= Setting the parameter’s value to 0 causes the player to not display information like the video title and uploader before the video starts playing. If the player is loading a playlist, and you explicitly set the parameter value to 1 then, upon loading, the player will also display thumbnail images for the videos in the playlist.
- mute= causes the audio to be muted. Allowed values are 0 (audio on, default) and 1 (audio is muted).
- & is used to add another function
Here’s a real example:
https://www.youtube.com/embed/mhzCJWk9_GE?autoplay=1&loop=1&cc_load_policy=1&rel=0&controls=0&showinfo=0&playlist=mhzCJWk9_GE
Note: please be aware that autoplay function may not work properly on all systems depending on the user’s or local YouTube settings. So, in order for a video to start it may be necessary that the picturewall is shown in game. An easy fix to this problem is attained by locating the picturewall right behind the entry point where players join your room. This way you will force the picturewall to be displayed as any player enters your location.
Tip: Clicking on the Youtube picturewall in the game will let you access the YouTube functions panel. You can exit by clicking on the “ESC” button on your keyboard.
Unfortunaly it is NOT possible to synch Youtube Videos with other players in the same location.
If YouTube videos do not start automatically, you need to locate the picturewall and press start.
